Nina Taylor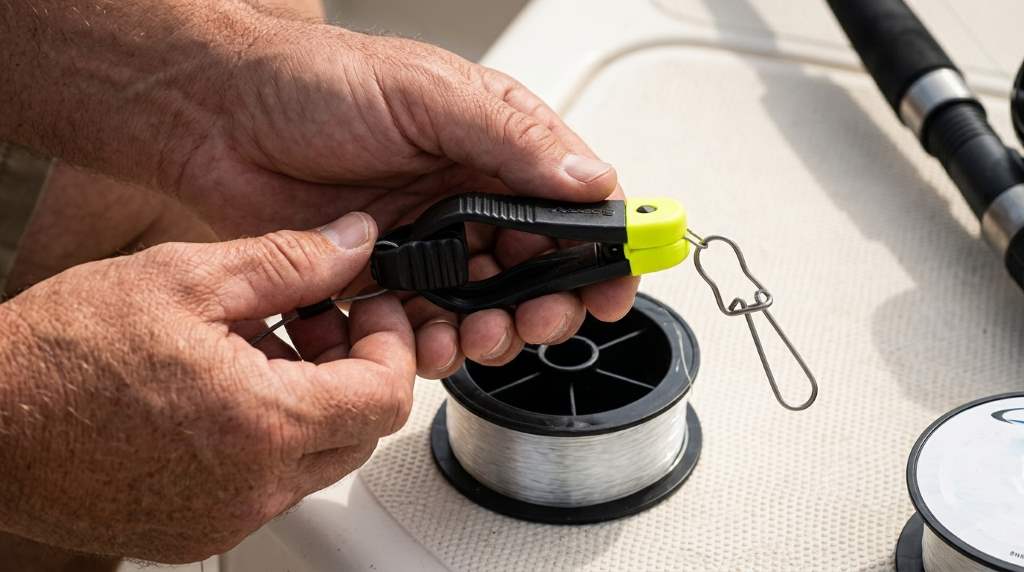
The Scotty Mini Power Grip Plus works as a compact line release for downrigger and planer board fishing. Scotty currently lists three rigged Mini versions plus a four piece planer board pack, giving anglers several setup options.
Using it correctly starts with attaching the snap, placing your fishing line between the soft pads, and setting suitable release tension. For a closer look at the product, the Scotty Mini Power Grip Plus uses a simple grip system that lets you fine tune line holding pressure.
Key Takeaways
- Attach the snap securely before placing your fishing line.
- Position the line deeper inside the jaws for stronger holding pressure.
- Use the tension adjuster when you need more or less release force.
- Start with moderate tension and test the release before fishing.
- Inspect the pads regularly for wear, dirt, or damage.
- Match the release setting to your line, lure, and trolling load.
Understand How the Mini Power Grip Plus Works
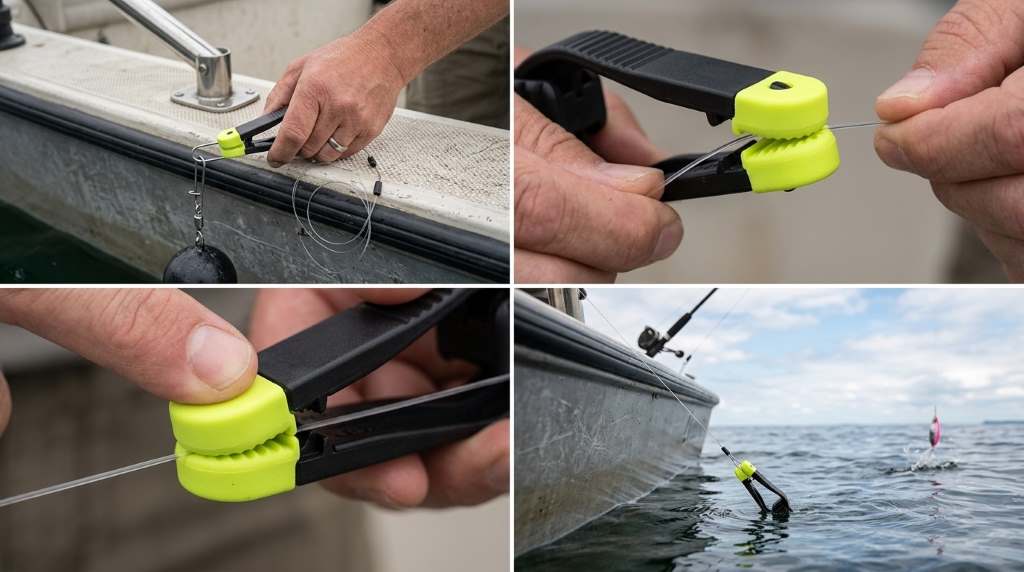
The Mini Power Grip Plus holds your fishing line between two soft gripping pads. During trolling, the clip stays connected while the lure follows behind your boat.
When a fish strikes, pressure from the rod and fish can pull the line free. Therefore, proper tension lets the release hold during trolling while still releasing during a strike.
The Mini version uses a compact design for smaller trolling setups and planer board applications. Scotty offers versions with wire leaders, cannonball snaps, self locating snaps, and planer board connections.
Prepare Your Fishing Setup
Before using the release, check your rod, reel, main line, leader, lure, and trolling system. Also inspect the Mini Power Grip Plus for damaged pads or bent connection hardware.
Next, make sure your line runs smoothly through the guides. Remove knots, damaged sections, or excessive line twist before attaching the release.
A clean setup makes release behavior easier to predict. It also helps you identify whether a problem comes from the clip or another part of your rig.
Check the Release Components
- Inspect both gripping pads for dirt or visible wear.
- Check the wire leader for kinks or damage.
- Confirm that the snap closes completely.
- Make sure the tension adjuster moves correctly.
- Check your fishing line for abrasion near the attachment point.
How to Attach the Mini Power Grip Plus
Start by connecting the snap swivel to the downrigger weight or compatible trolling connection. Confirm that the snap closes fully before lowering the system.
Next, hold the release and squeeze the jaws apart. Place your fishing line between the soft pads without crossing or twisting it.
Release the jaws slowly and inspect the line position. The pads should grip the line firmly without visibly crushing or damaging it.
Set the Line Position
The line position inside the jaws controls much of the holding pressure. A position closer to the outer tip creates lighter release tension.
Moving the line farther into the jaws increases the gripping force. Therefore, use the shallowest position that safely holds your trolling setup.
This approach gives you a practical starting point without forcing excessive pressure onto the fishing line. Always test the setup before sending the lure deep.
Adjust the Release Tension
The tension adjuster provides another way to control how firmly the release holds your line. Move it according to the required holding pressure for your setup.
Use less tension when your trolling load stays light and releases easily. Increase tension when the line repeatedly slips from the jaws during normal trolling.
However, avoid setting maximum tension automatically. Excessive holding force can delay release when a fish strikes.
Use a Simple Tension Test
First, attach the line and place the release under your normal trolling configuration. Then apply gradual hand pressure to simulate additional load.
Watch how the line moves inside the pads as pressure increases. Adjust the tension until the release holds securely without becoming unnecessarily difficult to trigger.
Afterward, run the setup at slow trolling speed before increasing your normal speed. This test can reveal unwanted line movement early.
Using the Release With a Downrigger
Downrigger fishing requires the release to connect your fishing line with the weighted trolling system. The clip lets the weight control lure depth while the rod remains free to detect strikes.
Attach the Mini Power Grip Plus to the downrigger connection first. Then attach your fishing line between the gripping pads and lower the system gradually.
Keep the rod positioned correctly in its holder during deployment. Maintain enough line control to prevent slack from forming around the release.
Lower the Lure Carefully
Let the lure move behind the boat before lowering the downrigger weight. This sequence reduces sudden tension and helps prevent tangles.
Once the desired depth approaches, watch the rod tip for abnormal movement. Correct any slack or line contact before continuing your trolling pass.
Keep your trolling speed consistent when testing release behavior. Changes in speed can alter lure resistance and line pressure.
Using the Mini Power Grip Plus With a Planer Board
The Mini Power Grip Plus also works with compatible planer board setups. In this configuration, the release connects the fishing line to the board system while the lure tracks away from the boat.
Attach the appropriate planer board snap before clipping the fishing line. Then place the line between the pads and check the connection carefully.
Start with moderate holding pressure when testing a new board and lure combination. Increase tension only when the setup cannot maintain its position.
Prevent Planer Board Problems
- Keep the release connection clear of weeds and debris.
- Check the line position after every major adjustment.
- Watch for excessive board movement during trolling.
- Inspect the clip after heavy strikes or sudden line pulls.
- Retest the tension when you change lure size or trolling speed.
How to Set Tension for Different Fishing Conditions
There is no single tension setting that suits every trolling situation. Instead, adjust the release according to line type, lure resistance, trolling speed, and target fish.
Start with lighter tension when using a small lure and low resistance presentation. Then increase tension gradually if the lure repeatedly pulls the line from the clip.
Likewise, larger flashers, dodgers, and other high resistance components can demand more holding force. Test the complete rig rather than adjusting the release by itself.
When the Line Releases Too Easily
If the line slips during normal trolling, first check its position inside the jaws. Move the line farther into the gripping area before making larger tension changes.
Next, inspect the pads for contamination or wear. If the pads look damaged, replace them before increasing pressure significantly.
When the Line Will Not Release
If the release stays attached after a strike, reduce the holding pressure gradually. Check whether you placed the line too deeply inside the jaws.
Also inspect the tension adjuster and pads for problems. A release should respond consistently when you apply controlled pulling pressure.
Common Mistakes to Avoid
Many release problems come from setup errors rather than defective equipment. Fortunately, most problems disappear after you correct line placement and tension.
- Do not squeeze the line excessively between damaged pads.
- Do not assume maximum tension provides better performance.
- Do not ignore dirt trapped between the gripping surfaces.
- Do not change several settings simultaneously during testing.
- Do not continue using visibly damaged connection hardware.
Instead, make one adjustment at a time and observe the result. This method makes troubleshooting faster and keeps your release settings consistent.
How to Maintain the Release
Rinse the release with fresh water after fishing, especially after exposure to saltwater. Allow the components to dry before storing the equipment.
Check the gripping pads regularly for hardening, cracking, or excessive wear. Also inspect the leader and snap because small connection problems can cause lost tackle.
Keep the release away from unnecessary heat and crushing pressure during storage. Store several clips so they cannot rub aggressively against heavy metal equipment.
When to Replace the Pads
Replace worn pads when they no longer grip your line consistently. Reduced friction can create unexplained releases even when your tension setting remains unchanged.
Clean pads can improve consistency, but cleaning cannot restore damaged gripping surfaces. Therefore, replace worn components rather than compensating with excessive tension.
A Practical First Time Setup Routine
First, connect the release to the correct snap point and inspect every connection. Next, place your fishing line between the pads near the lighter tension area.
Then lower your setup slowly while watching the rod tip. If the line remains secure, gradually increase trolling speed and observe the release again.
After that, adjust the tension only when the fishing conditions require it. Record the setting mentally or with a simple note for future trips.
Finally, test the release after changing lure size, line type, trolling speed, or board position. Small changes can alter the pressure reaching the clip.
How to Troubleshoot Inconsistent Release Performance
Start troubleshooting by checking the simplest possible causes. Examine line placement, pad condition, tension position, and connection hardware in that order.
If the release slips, increase holding force gradually. If it refuses to release, reverse that process and reduce the tension.
Next, consider the lure and trolling load. A larger presentation can create substantially more resistance than a smaller lure.
Finally, test the setup under controlled conditions before returning to normal trolling. This approach helps separate equipment problems from changing water conditions.
How to Get More Consistent Results
Consistency comes from using repeatable settings rather than guessing before every deployment. Keep your line position, tension, and trolling speed predictable whenever conditions remain similar.
When conditions change, adjust one factor at a time. That simple habit makes your setup easier to understand and easier to reproduce.
Also inspect the release after every significant strike or snag. A sudden load can reveal damage that remained invisible during ordinary trolling.
Frequently Asked Questions
How does the Scotty Mini Power Grip Plus hold fishing line?
It holds fishing line between soft gripping pads while adjustable positioning controls release tension.
How do I increase the release tension?
Move the line farther into the jaws and adjust the tension mechanism toward stronger holding pressure.
Can I use it with a planer board?
Yes, compatible Mini Power Grip Plus configurations include a planer board release option.
Why does my line keep slipping from the release?
Check line placement, pad condition, lure resistance, and tension before increasing holding pressure.
How often should I inspect the release?
Inspect it before each trip and again after heavy strikes, snags, or noticeable release problems.
Final Thoughts
The Scotty Mini Power Grip Plus becomes easier to use once you understand line placement and tension control. Start with moderate pressure, test your complete rig, and adjust gradually.
For dependable results, inspect the pads and connection hardware regularly. Use the same setup process each time, then fine tune it when fishing conditions change.
Try the step by step method on your next trolling trip and record the settings that perform consistently. That simple routine can make deployment faster and release behavior more predictable.